> For the complete documentation index, see [llms.txt](https://docs.drawtify.com/llms.txt). Markdown versions of documentation pages are available by appending `.md` to page URLs; this page is available as [Markdown](https://docs.drawtify.com/easier-graphics-solution/how-does-it-work/how-to-add-images-and-image-effects.md).
# 7. How to add images and image effects?
## Easily add images and image effects
Click  "Image" in the toolbar of Drawtify Designer to easily upload your own pictures. Support JPG, PNG, JIF, SVG format. An
  "Upload" library has been added to the toolbox of Drawtify Designer Online. Not only can you easily upload your own images, but you can also save them online (PRO users use 1GB of storage space).
Of course, you can also choose from the
"Upload" library has been added to the toolbox of Drawtify Designer Online. Not only can you easily upload your own images, but you can also save them online (PRO users use 1GB of storage space).
Of course, you can also choose from the  "Image" library in the toolbox. Click or drag to get the selected image.
### 7-1. Add image filters and masks
When you click on any image in the canvas, the
"Image" library in the toolbox. Click or drag to get the selected image.
### 7-1. Add image filters and masks
When you click on any image in the canvas, the  "Image Inspector" on the right will be automatically called. Here, you can click
  "Image Filter" to add effects to the image. Click any image filter template to get its filter effect easily. Of course, you can also "customize" to get the most satisfactory effect you think. E.g:
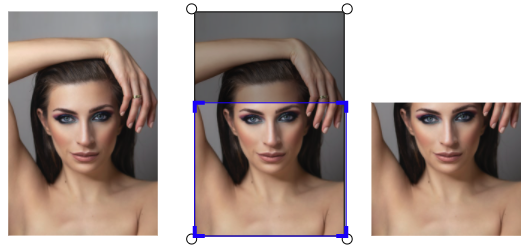
In addition, the mask of Drawtify Designer can achieve arbitrary rectangular cropping of images. Just click
"Image Filter" to add effects to the image. Click any image filter template to get its filter effect easily. Of course, you can also "customize" to get the most satisfactory effect you think. E.g:
In addition, the mask of Drawtify Designer can achieve arbitrary rectangular cropping of images. Just click  "Mask Resize", or double-click the image directly. E.g:
It is worth mentioning that Drawtify Designer has a magical **magic photo frame**. Click on the image, then select a suitable shape in the "icons" library, drag and drop to the image, you can realize the magic photo frame of the selected shape. E.g:
### 7-2. **Custom magic photo frame**
Of course, you can also customize the photo frame. Just draw the ideal shape through the built-in vector editor. First click on the image, then press and hold "shift" and then click on the shape, and finally click on
"Mask Resize", or double-click the image directly. E.g:
It is worth mentioning that Drawtify Designer has a magical **magic photo frame**. Click on the image, then select a suitable shape in the "icons" library, drag and drop to the image, you can realize the magic photo frame of the selected shape. E.g:
### 7-2. **Custom magic photo frame**
Of course, you can also customize the photo frame. Just draw the ideal shape through the built-in vector editor. First click on the image, then press and hold "shift" and then click on the shape, and finally click on  "Path Add To Image" to get a **custom magic photo frame**. E.g:
### 7-3. Remove image background
Delete the image background, for Drawtify Designer, there is no learning difficulty. Just click
"Path Add To Image" to get a **custom magic photo frame**. E.g:
### 7-3. Remove image background
Delete the image background, for Drawtify Designer, there is no learning difficulty. Just click  "BG Removal", and then click the image to reserve the area you want (pen tool). Of course, you may need to spend a little time thinking it looks a bit complicated, but you can click on "BG Removal" unlimited times to modify it. E.g:
### 7-4. Add special effects to images
Click
"BG Removal", and then click the image to reserve the area you want (pen tool). Of course, you may need to spend a little time thinking it looks a bit complicated, but you can click on "BG Removal" unlimited times to modify it. E.g:
### 7-4. Add special effects to images
Click  "Node Filter" to add special effects to the image, and use "Filter Template"
 to easily obtain filter effects with one click.
Click
to easily obtain filter effects with one click.
Click  "Blend Mode"
  to add a montage effect to the image. E.g: